
Even though the advent of Android OS has paved a way for a new era of mobile technology and usage, but it has also offered various chaotic implications which are turning out to be true with time. Whether it is about listening to music, texting using messengers, surfing the internet using web browsers, watching videos and movies, you mostly prefer to stick to your mobile instead of large-sized computers for your own convenience. So in a way, your Android mobile is a gigantic hub of innumerable files, folders, and personal data which if accidentally falls on wrong hands can really turn the situation upside down. There could be situations when you decide to hand over or sell your Android device to someone else as that too is quite a predicament. Hence it is very much required to know how to erase data from your Android device when needed in case of aforementioned emergencies.
In the article given below, we have demonstrated few methods which are easy to implement and can easily help you learn to erase data especially messages from your device. Keep reading to know the methods as you move down the article.
Also, Read:
- Top ISO Burner For Windows 7/8/10
- Google Account Manager APK Download
- Best 3DS Nintendo Emulator For Android
- SuperCloud Mp3 Downloader For Android
- Fix Driver Power State Failure in Window 10
Method 1: Erase Messages Manually for Android
If you have been using Android device for a quite a long time then you must be aware of the fact that every Android Phone has an in-built deletion facility which helps the user to first choose and then delete accordingly. Read the steps carefully given below to learn the method:
Step 1. Firstly turn on your Android device and run the messaging app.
Step 2. Check the inbox messages thoroughly before taking the decision of which one to delete and which one to keep. Tap on a particular message or a thread of messages that you wish to remove.
Step 3. Now tap on the “Trash” icon to delete them all.

Step 4. Tap on “Yes” option that follows to confirm the deletion process.
CONS:
- The method is time-consuming.
- The erased messages can be deliberately retrieved using data recovery tools.
Method 2: Erase Messages on Android by using Safewiper Utility
It is the most efficient and best data-erasing software available on the Internet market lately. The deleted data cannot be recovered by any method by anyone, whether a mobile expert or a hacker using even the most powerful recovery tool available in the market. The personal information is removed from your internal storage as well as from your SD card. The software is compatible with almost all the versions of Windows, that is XP/ Vista/ 7/ 8/ 10 and also with Mac computers. The program, fortunately, works with all major Android devices, for instance, HTC, Samsung, LG, Motorola, etc.
The software usually comes with 3 operational modes to erase data – Erase All Data, Erase Private Data, Erase App Data.
Here we would discuss only the “Erase All Data” as we are intending to clean the device completely instead by erasing figments of the information stored in the device.
Go through the steps served below to know the method in detail:
Working of SafeWiper for Android
Step 1. Download the program file from the official website to your Windows or Mac PC. Open the downloaded file to install it.
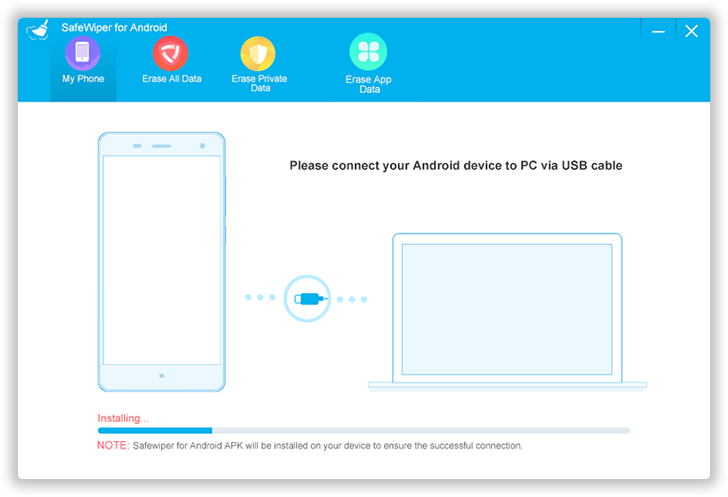
Step 2. Next, connect your Android device to your accessible computer via USB cable.
Step 3. The important part of this procedure is to enable the USB Debugging Mode. In order to do that go to Settings> Developer options> USB Debugging and enable the debugging mode.

Step 4. Choose “Erase Private Data” from the 3 available operational modes and the scanning of your device will be started.
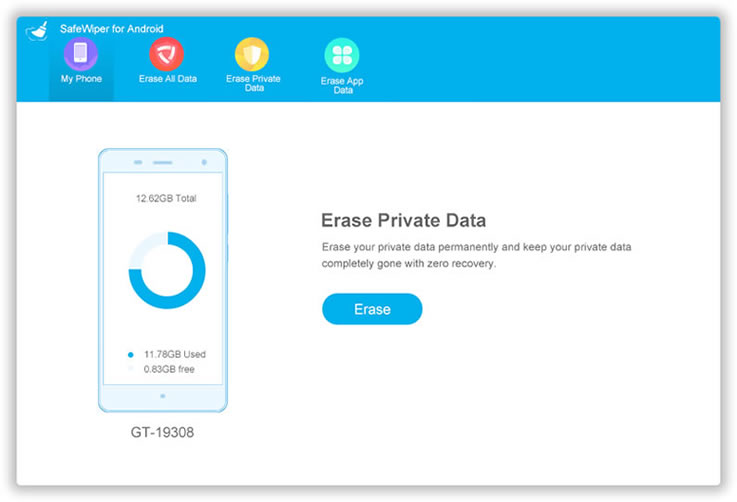
Step 5. Now go to the left side panel after the scanning is over, and select “Messages”. You will be shown all the messages of your device from which you can choose which one to delete and which one to keep. After your message selection click on “Erase” button to start deleting the messages.

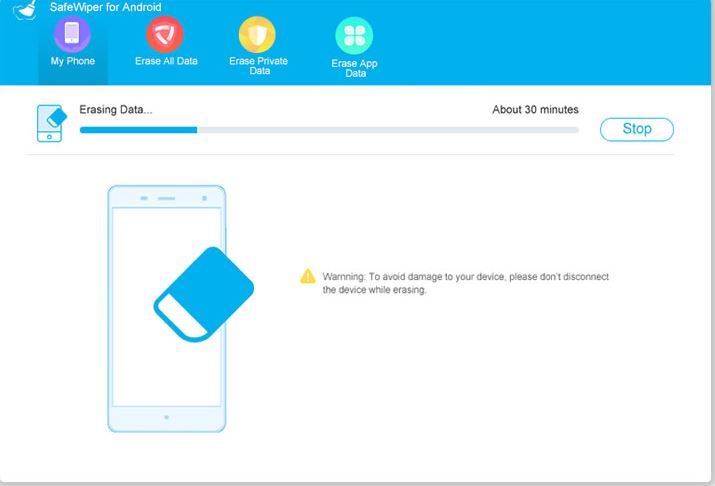
Step 6. The app will start deleting the chosen messages. Just make sure that the device remains connected to the computer all along the process.
Method 3: Erase Messages from Android via Recovery Mode
This method is relevant just and just when you are prepared to erase everything from your Android phone, including settings, applications, diversions, music, recordings, and furthermore the messages obviously. You can do as such on the off chance that you will hand over the device to another person or selling to a buyer. The steps for the methods are as follows:
Step 1. Firstly Turn Off your Android device if it is in the Turn On mode.
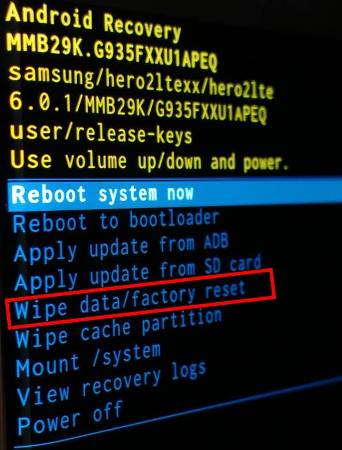
Step 2. Now; Switch On your device by pressing the “Home + Volume down + Power” button combination. Your device will automatically enter the recovery mode.
Step 4. Out of the list of many options, move to the “Wipe data/Factory Reset” option and press “Home” button to choose it.
Your phone will be restarted as soon as the factory reset progress is completed, but it will be completely empty this time due to complete data removal.
CONS:
- Alongside your messages, your contact details too shall be deleted.
- It is not recommended if you are not ready to erase your entire phone.
- The messages can be retrieved by professionals using powerful data recovery tools.
Conclusion:
As you can see out of all the methods mentioned above, they all possess some precarious cons which cannot be neglected when it is about the safety of your device and your personal details, thus SafeWiper is the only best choice to heed. SafeWiper for Android is a powerful data-erasing app that erases all your device data with no chance of recovery in the future.
The software makes sure that all your personal details which are here in this article are messages do not remain detectable by any technical experts, thereby keeping your privacy safe and sound. The software has been tested, rated by millions of users, so you completely rely on it for a guaranteed result.
